- i only speak liquid
- Posts
- "i only speak liquid" #53: Displaying Variant-Specific Information with Metafields
"i only speak liquid" #53: Displaying Variant-Specific Information with Metafields
Written by Michael (a Storetasker Expert)
Hey everyone!
I'm thrilled to share my first contribution to the i_only_speak_liquid newsletter! I'm Michael, a freelance web developer and proud member of the Storetasker network.

What I’ve been thinking about:
In the competitive world of e-commerce, providing detailed and variant-specific product information can significantly enhance your customers' shopping experience. By default, Shopify doesn't dynamically display variant metafields based on the selected variant. However, with a few tweaks, you can ensure that this information updates automatically as customers choose different options. In this developer guide, we'll walk you through creating variant metafields in Shopify and show you how to dynamically display these metafields using JavaScript.
Step 1: Creating Variant Metafields in Shopify
First, let's create variant metafields for your product variants. Shopify's admin interface makes it easy to manage metafields without any coding knowledge. Follow these steps:
Navigate to Metafields Settings:
In your Shopify admin panel, go to Settings > Custom Data > Variants
Add a New Metafield Definition:
Click on Add definition.
Define the metafield key and namespace (e.g., custom.description for a description metafield).
Select the content type (e.g., Single line text, Multi-line text, etc.).
In this example, we will use ‘Multi-line text’
Click ‘Save’
Assign Metafields to Variants:
Go to Products and select the product you want to edit.
Scroll down to the Variants section and click on a variant.
Add the desired information for each variant in the Metafields section at the bottom.
Step 2: Setting Up Your Shopify Theme
Next, we'll update your Shopify theme to display the metafield based on the selected variant. We'll use a hidden select element to store the metafield values and JavaScript to update the display.
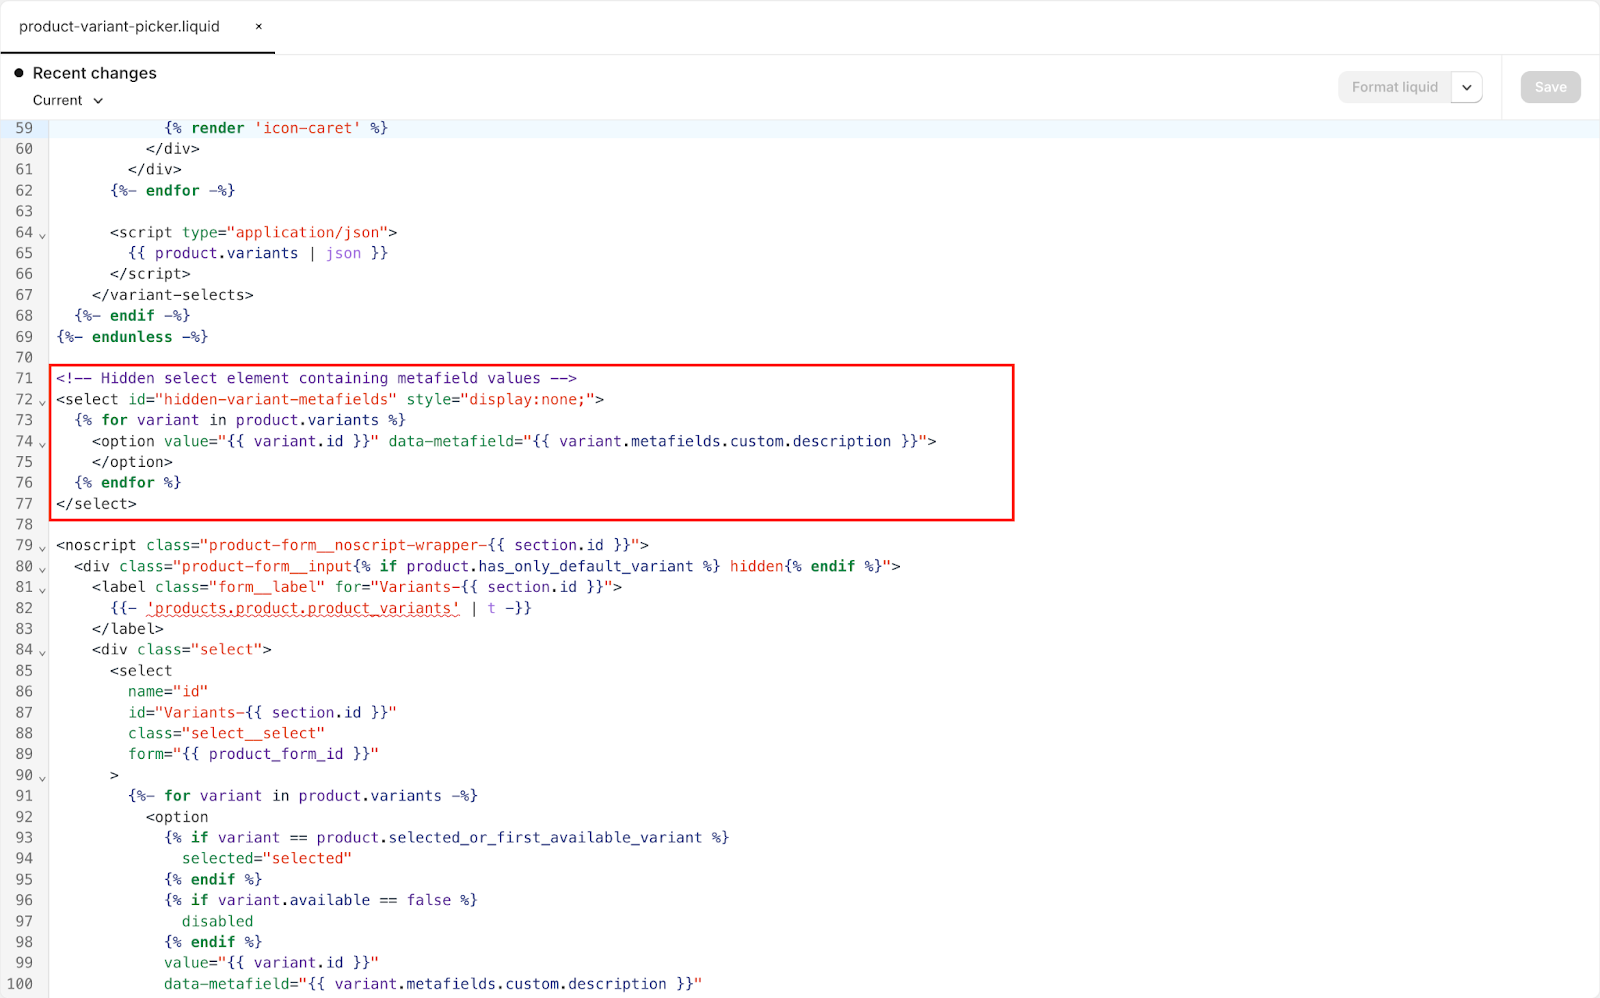
Add the Hidden Select Element:
In this example, we are using the Dawn theme, so we will add this element to the product-variant-picker.liquid snippet
Add the Variant Metafield Display Element:
There are a couple of ways to go about adding this.
Add the element in the code files where you want it to display
This could be anywhere in the product.liquid snippet or template depending on the theme
Add the element to a custom liquid block or section provided by the theme
Since Dawn has a custom liquid block, we will add the element there
<!-- Metafield display element -->

<div id="variant-metafield">

  {{ product.selected_or_first_available_variant.metafields.custom.description }}

</div>
Locate a printed variant id element
In the Dawn theme, this can be found within the product form
The reason why we will use this element is because the native Dawn code updates the value attribute with the currently selected variant id. This will make it easy for us to fetch the currently selected variants' ID
Note: not all themes are built the same. Some may have an element like this, and some may not. Most themes input the selected variant ID as a parameter in the URL once the variant is changed.


Step 3: Writing the JavaScript
Finally, we'll write a JavaScript snippet to update the displayed metafield when the variant changes.
<script>

  document.addEventListener('DOMContentLoaded', function() {

    // Get the hidden variant ID input

    const variantInput = document.querySelector('.product-form .product-variant-id');

    if (!variantInput) return;

    // Select the variant metafield display element

    const variantMetafieldDisplay = document.getElementById('variant-metafield');

    // Select the hidden variant metafields select element

    const hiddenVariantMetafields = document.getElementById('hidden-variant-metafields');

    const updateMetafieldDisplay = () => {

      const selectedVariantId = variantInput.value;

      const selectedOption = hiddenVariantMetafields.querySelector(`option[value="${selectedVariantId}"]`);

      if (selectedOption) {

        console.log(selectedOption);

        const metafieldValue = selectedOption.getAttribute('data-metafield');

        variantMetafieldDisplay.innerHTML = metafieldValue;

      }

    };

    // Create an observer instance linked to the callback function

    const observer = new MutationObserver(updateMetafieldDisplay);

    // Start observing the target node for configured mutations

    observer.observe(variantInput, { attributes: true, attributeFilter: ['value'] });

    // Initial update on page load

    updateMetafieldDisplay();

  });

</script>
Step 4: Test the functionality
Once you have all the code added, and you have filled out the variant metafield for variants of a product, preview the theme and head to the product. You should see the metafield appear where you placed it in Step 2.2. Go ahead and change the variant. If you see the metafield update every time you change the variant, hooray you did it! If not, go back through each step and make sure everything is linked together.
Putting It All Together
By following these steps, you can create and display variant-specific metafields dynamically in your Shopify store. This approach allows you to provide detailed, variant-specific information to your customers, enhancing their shopping experience and helping them make more informed purchasing decisions. Happy coding!
3 links you can’t miss:
ChatGPT - One of the ultimate ways to accelerate your workflow! With its ability to generate human-like text, assist with coding, and provide instant solutions, ChatGPT is a game-changer for boosting productivity.
Clockify - My go-to time tracker so I can keep track of time for each of my projects. Clockify helps me manage my hours efficiently, ensuring that I stay on schedule and maintain a balanced workload.
Notion - This is an amazing App/Site that I use as my home base. Notion's versatile platform allows me to organize my work seamlessly, combining note-taking, project management, and collaboration tools all in one place.
1 app I like:
I am sure everyone has used or at least heard of this app and for a good reason. Judge.me Reviews is an essential tool for any e-commerce store, allowing users to easily collect and showcase customer reviews, boosting credibility and sales.
One learning as a freelancer:
Trust your skills and your ability to learn
Entering the world of freelancing can be daunting, especially when you're relatively new, like I was with just a few years of experience. The biggest lesson I've learned is to trust in your skills and your ability to learn. When I first started, I encountered many tasks and customizations I had never dealt with before. Despite not knowing all the answers right away, I chose to say yes to opportunities because I believed in my capacity to figure things out. This approach pushed me out of my comfort zone and forced me to grow.
Challenging yourself is the best way to advance in any career, particularly as a developer. The process of tackling new problems, researching solutions, and learning new techniques is incredibly rewarding. Each time you overcome a hurdle, you not only expand your knowledge but also build confidence in your abilities. The satisfaction of solving a tough problem and seeing your skills evolve in real time is incomparable.
This mindset has been instrumental in my development journey. It’s about having the courage to take on tasks that seem difficult and trusting that you can rise to the occasion. By continually pushing yourself, you open up new possibilities and pave the way for continuous improvement and success.
Trust in yourself and get after it!
I hope you found my first edition insightful. I'd love to hear your feedback or any alternative approaches you might have. Feel free to share your thoughts and ideas!
Until next time,