- i only speak liquid
- Posts
- "i only speak liquid" #55: Unveiling Shopify's New Style Settings: Flexibility at Your Fingertips
"i only speak liquid" #55: Unveiling Shopify's New Style Settings: Flexibility at Your Fingertips
Written by Michael (a Storetasker Expert)
Michael Morgan
July 24, 2024
Hey everyone!
Welcome to my 3rd contribution to the i_only_speak_liquid newsletter! I'm Michael, a freelance web developer and proud member of the Storetasker network.

What I’ve been thinking about:
Shopify has recently introduced a game-changing feature in the Flex sections developer preview—Style settings. This enhancement empowers developers with greater control over the design of Shopify themes by providing adaptable style properties that can respond to different breakpoints. Here's a deep dive into what these settings offer and how to leverage them in your themes.
What Are Style Settings?
Style settings are a new category of input settings designed to hold values that map directly to CSS properties. Unlike traditional input settings, these can hold different values for various breakpoints, ensuring responsive and flexible design control.
Categories of Style Settings
There are two primary categories:
Style Panel Settings: Pre-organized by Shopify, these settings map to common CSS property categories such as layout, size, and spacing.
Style Input Settings: Coming soon, these settings will allow values adaptable by breakpoint, tied directly to specific CSS properties.
Exploring Style Panel Settings
Size Panel
The style.size_panel controls the width and height of elements. Here’s a quick example:
{
  "type": "style.size_panel",
  "id": "size",
  "label": "Size",
  "default": {
    "width": "25%",
    "height": "auto"
  }
}
Supported properties include:

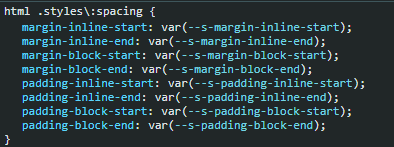
Spacing Panel
The style.spacing_panel manages padding and margin:
{
  "type": "style.spacing_panel",
  "id": "spacing",
  "label": "Spacing",
  "default": {
    "padding": "16px 2px",
    "margin": "0px"
  }
}
It supports shorthand and longhand properties for padding and margin, ensuring flexibility and precision.

Layout Panel
The style.layout_panel controls layout properties such as direction, positioning, and alignment:
{
  "type": "style.layout_panel",
  "id": "layout",
  "label": "Layout",
  "default": {
    "display": "flex",
    "flex-direction": "row",
    "flex-wrap": "wrap",
    "gap": "20px",
    "justify-content": "flex-start",
    "align-items": "center"
  }
}
Supported properties include:

Here is a preview of the settings within the Theme Customizer. The values shown are the default ones you set, and you can easily add other supported properties by clicking the ‘+’ icon.

Utilizing Style Settings
Accessing Style Settings
You can access these settings in Liquid using the id attribute:
Theme settings:
Section:
Block:
Applying Style Settings
Use the class_list filter to apply style settings to elements:
<div class=”wrapper {{ block.settings.spacing | class_list }}”>
  <div class="group {{ block.settings.layout | class_list }}">
    {% content_for “blocks” %}
  </div>
</div>
{% schema %}
{
  "name": "Group",
  "blocks": [{"type": "@theme"}, {"type": "@app"}],
  "settings": [
    {
      "type": "style.layout_panel",
      "id": "layout",
      "label": "Layout",
      "default": {
        "flex-direction": "column"
      }
    },
    {
      "type": "style.spacing_panel",
      "id": "spacing",
      "label": "Spacing",
      "default": {
        "padding": "20px"
      }
    }
  ]
}
{% endschema %}
This method ensures that default values and merchant edits are applied consistently.
You can also apply all of the block or section settings to a single element by doing the following:
<div class="group {{ block.settings | class_list }}">
  {% content_for “blocks” %}
</div>
{% schema %}
{
  "name": "Group",
  "blocks": [{"type": "@theme"}, {"type": "@app"}],
  "settings": [
    {
      "type": "style.layout_panel",
      "id": "layout",
      "label": "Layout",
      "default": {
        "flex-direction": "column"
      }
    },
    {
      "type": "style.spacing_panel",
      "id": "spacing",
      "label": "Spacing",
      "default": {
        "padding": "20px"
      }
    }
  ]
}
{% endschema %}
Breakpoint-Specific Values
You can specify different values for different breakpoints using media queries. For instance:
jsonCopy code
{
  "type": "style.spacing_panel",
  "id": "spacing",
  "label": "Spacing",
  "default": {
    "padding": "20px",
    "margin": "10px",
    "@media (--mobile)": {
      "padding": "10px",
      "margin": "0px"
    }
  }
}
Currently, only the mobile breakpoint is available, but more will be introduced soon.
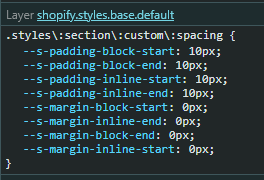
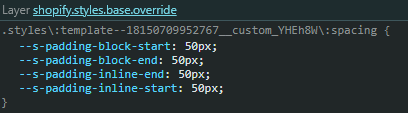
Previewing Your CSS
Here, you can see all the default properties populated, as well as any properties you have overridden.
Conclusion
Shopify’s new Style settings bring a new level of customization and responsiveness to theme development. By leveraging these settings, developers can create more adaptable and visually appealing themes that cater to various device sizes and merchant preferences. Stay tuned for more updates as Shopify continues to enhance these capabilities! You can find more info in the Shopify Documentation.
3 links you can’t miss:
Auto Prefixer is a PostCSS plugin that automatically adds vendor prefixes to your CSS, ensuring cross-browser compatibility. It eliminates the need to manually insert prefixes for properties like animations, transitions, and flexbox, streamlining the CSS writing process. This tool is essential for maintaining efficient, compatible, and up-to-date styles across different browsers. It has personally saved me a lot of time when updating my CSS for broad browser support!
JSON Formatter & Validator is an online tool designed to format, validate, and debug JSON data. It provides a user-friendly interface to make JSON data readable and easily accessible. This tool is useful for developers working with APIs and also Schema settings, ensuring that JSON structures are correctly formatted and free of errors.
Stack Overflow is a question and answer site for professional and enthusiast programmers. It's a great place to find solutions to coding problems, share knowledge, and connect with other developers. The community-driven platform covers a wide range of topics and languages, including those relevant to Shopify development.
1 app I like:
Mechanic is a powerful automation tool designed to streamline and optimize various store operations. With Mechanic, store owners can automate routine tasks such as order processing, inventory management, and customer notifications, freeing up valuable time to focus on growing their business. The app offers a library of pre-built automation tasks and allows for custom scripting, making it highly adaptable to unique business needs. Whether you're looking to enhance productivity or improve the customer experience, Mechanic provides a versatile and efficient solution for managing your Shopify store.
One learning as a freelancer:
Recording your client meetings
One invaluable lesson I've learned as a freelancer is the importance of recording client meetings. I use Loom for all the recordings that I do. To ensure transparency and respect your client's privacy, you can simply ask at the beginning of the meeting, "I record all of my meetings, is that okay with you?" Recording meetings allows you to revisit discussions and capture every detail, which is particularly useful for complex projects where numerous details are discussed. This practice helps prevent misunderstandings and ensures that nothing is forgotten.
Additionally, having a recorded record of your meetings can serve as evidence if any disputes or issues arise later on. It provides a clear account of what was agreed upon, protecting both you and your client. This added layer of security can help maintain a professional and trustworthy relationship, as both parties can refer back to the recordings if there are any discrepancies. Overall, recording meetings is a simple yet effective way to enhance communication and safeguard your freelance business.
I hope you found my third edition insightful. I'd love to hear your feedback. Feel free to share your thoughts and ideas!
Until next time,